When working with webapplications and back-end services, typically the first step to get your application deployed is packaging it as a Docker image and publishing it on a repository. Despite this being a recurring pattern, I noticed I keep spending a lot of time setting up the same boilerplate over and over again. So why not document and share it?
In this post I'll walk through setting up a basic CI pipeline using GitHub Actions that builds and pushes Docker images to AWS ECR. I hope this is helpful to both people new to GitHub Actions and/or AWS, as well as function as a reference for people setting up their own projects.
Contents:
Overview
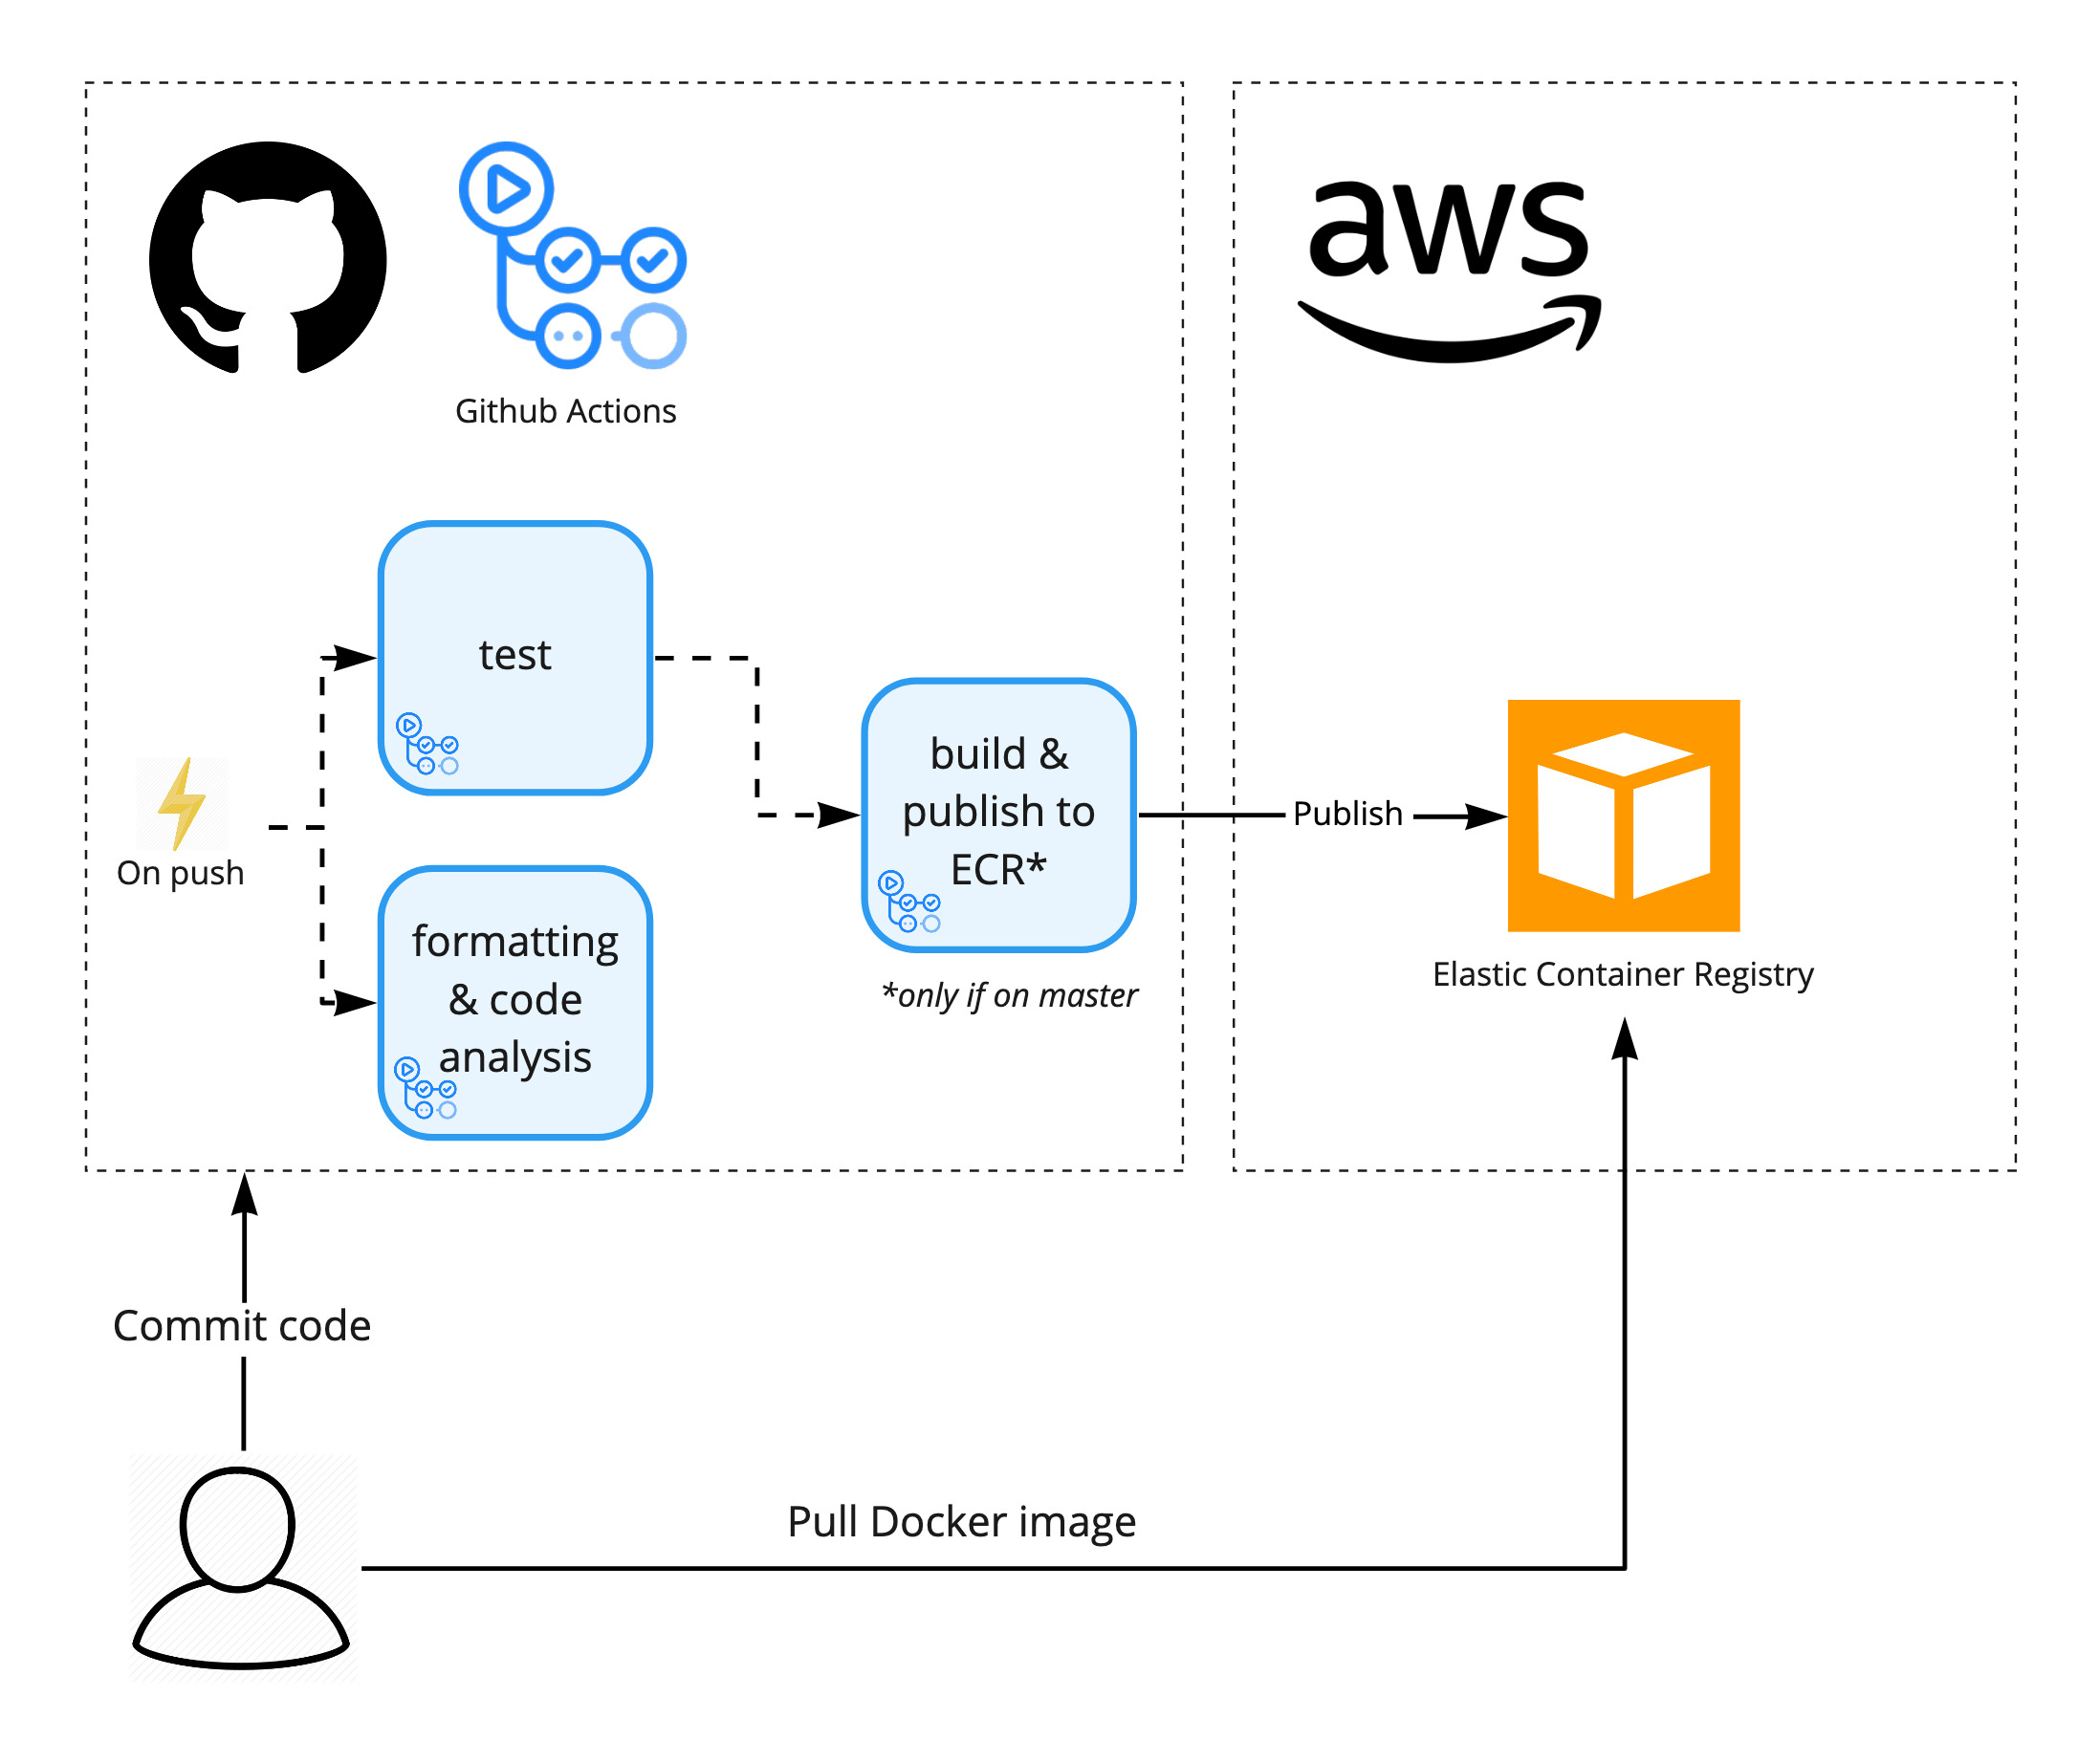
This post will focus on the first step of a software delivery pipeline: CI or Continuous Integration. A typical CI pipeline should:
- run the test suite on every commit, to provide constant feedback and (hopefully) detect regressions as soon as possible
- for every commit to trunk, build and publish a new build artifact
From here on another process can grab the published artifact and deploy it somewhere. This step would be the start of CD or Continuous Delivery.
The concept of a CI pipeline is technology agnostic, but in this post I'll focus on creat-ing a CI pipeline using GitHub Actions and AWS ECR. They are both fairly quick to set up yet powerful to use. GitHub Actions is tightly integrated with GitHub itself, making it highly approachable. AWS ECR is 'just' a Docker repository but becomes indispensable once you start using other AWS services like EC2 and Fargate.
Of course, if you are not using either of these services already you'll be better of using whatever else you are already familiar with.
Below a simple overview of the CI pipeline we'd like to create. To see an example of this setup in action, check out kvrhdn/ci-with-actions-and-ecr.
Docker repository - AWS ECR
Note: this walkthrough uses the AWS CLI. These steps can also be done using the console, but I prefer using the CLI since it's easier to document steps and it's less involved than setting up a tool like Ansible or Terraform.
First up, we have set up a Docker repository to host our Docker images. AWS offers the Elastic Container Registry (ECR) for this purpose. Once you start deploying to EC2, Fargate or Elastic Beanstalk you'll typically source your images from ECR.
Creating a new repository is pretty straight-forward:
$ aws ecr create-repository --repository-name <REPO>
After creating the repository, you should be able to see it on the console (don't forget to select your region in the top-right corner).
While storing Docker images on ECR isn't super expensive, storing hundreds or even thousands of unused images isn't particularly useful. You can add a Lifecycle Policy to a repository, so AWS can determine for itself when images can be deleted.
The following example is a simple policy that limits the total amount of images. This will delete the oldest image when more than 100 images exist at once. If you wish to keep certain images forever, you'll have to look at more advanced lifecycle policies, but in my experience this is good enough for most project with rolling releases.
{
    "rules": [
        {
            "rulePriority": 1,
            "description": "Limit amount of images to 100",
            "action": {
                "type": "expire"
            },
            "selection": {
                "countType": "imageCountMoreThan",
                "countNumber": 100,
                "tagStatus": "any"
            }
        }
    ]
}
Save this policy in a file and apply it using the CLI:
$ aws ecr put-lifecycle-policy                              \
    --repository-name <REPO>                                \
    --lifecycle-policy-text file://my-lifecycle-policy.json
Configuring a user for CI
To allow CI to push Docker images to ECR, it needs a user account with at least push access to the Docker repository.
First, create a user that will be used by the CI:
$ aws iam create-user --user-name <USERNAME>
Define a policy document that grants push access to the Docker repository:
{
    "Version": "2012-10-17",
    "Statement": [
        {
            "Sid": "GetAuthorizationToken",
            "Effect": "Allow",
            "Action": [
                "ecr:GetAuthorizationToken"
            ],
            "Resource": "*"
        },
        {
            "Sid": "ManageRepositoryContents",
            "Effect": "Allow",
            "Action": [
                "ecr:BatchCheckLayerAvailability",
                "ecr:GetDownloadUrlForLayer",
                "ecr:GetRepositoryPolicy",
                "ecr:DescribeRepositories",
                "ecr:ListImages",
                "ecr:DescribeImages",
                "ecr:BatchGetImage",
                "ecr:InitiateLayerUpload",
                "ecr:UploadLayerPart",
                "ecr:CompleteLayerUpload",
                "ecr:PutImage"
            ],
            "Resource": "arn:aws:ecr:<REGION>:<ACCOUNT ID>:repository/<REPO>"
        }
    ]
}
Add this as an inline policy document to the user:
$ aws iam put-user-policy                                   \
    --user-name <USERNAME>                                  \
    --policy-name access-ecr                                \
    --policy-document file://my-policy-document.json
And finally, create an access key for the new user:
$ aws iam create-access-key --user-name <USERNAME>
Hold on to the access key for now, you'll need to configure this in GitHub Actions later.
Build pipeline - GitHub Actions
Setting up GitHub Actions is as 'simple' as adding a .yaml file to your repository under .github/workflows/. The difficult part is finding out how to structure this file...
When I'm setting up a new project, I typically start from the examples provided by GitHub and evolve from there. Take a look at the workflow syntax to see what can be configured. For more details about how GitHub Actions works, I recommend checking out the documentation.
Structuring a GitHub Actions workflow
When designing your workflows it is important to grasp the different concepts, in short:
- workflow: this is the entire
.yamlfile, a workflow contains one or more jobs and can be triggered by an event or on a schedule - job: a job is a collection of steps, each job is run within a fresh virtual environment
- step: a step executes a command or runs an action
These concepts give a lot of freedom to design your workflow: you could chose to have a single job with a lot of steps, or you split up your jobs across multiple workflows.
Up to now I've always used a single workflow, but it would make sense to create separate workflows that are triggered by distinct type of events. For instance a workflow that runs on commit pushes and a workflow that is run when new issues are created.
Within a workflow, I prefer to use several small jobs over a single large one. This makes the jobs easier to understand and these jobs can be run in parallel. However, this is less efficient overall since each jobs spends some time initializing.
In my example I decided to have a single workflow CI with 3 jobs: test, fmt & clippy and build & publish to ECR:
name: 'CI'
# this workflow is triggered by "push" events
on: 'push'

jobs:
  # the jobs 'test' and 'fmt-clippy' run in parallel
  test:
    name: 'test'
    runs-on: 'ubuntu-latest'
    steps:
      - ...

  fmt-clippy:
    name: 'fmt & clippy'
    runs-on: 'ubuntu-latest'
    steps:
      - ...

  # 'publish' is run when 'test' succeeded and from branch 'master'
  publish:
    name: 'build & publish to AWS ECR'
    runs-on: 'ubuntu-latest'
    needs: 'test'
    if: "github.ref == 'refs/heads/master'"
    steps:
      - ...
Accessing AWS from GitHub Actions
Accessing AWS from within GitHub Actions is simplified with the the actions provided by AWS. To allow the build environment to access AWS, you'll first need to configure two secrets AWS_ACCESS_KEY_ID and AWS_SECRET_ACCESS_KEY. Secrets can be added to a repository via Settings > Secrets.
These are the steps interacting with AWS ECR:
- name: 'Setup AWS credentials'
  uses: 'aws-actions/configure-aws-credentials@v1'
  with:
    aws-access-key-id: '${{ secrets.AWS_ACCESS_KEY_ID }}'
    aws-secret-access-key: '${{ secrets.AWS_SECRET_ACCESS_KEY }}'
    aws-region: '<REGION>'

- name: 'Login to AWS ECR'
  id: 'login-ecr'
  uses: 'aws-actions/amazon-ecr-login@v1'

- name: 'Build, tag and push Docker image to AWS ECR'
  env:
    ECR_REGISTRY: '${{ steps.login-ecr.outputs.registry }}'
  run: |
    docker build --tag $ECR_REGISTRY/<PROJECT>:<BUILD_VERSION> .
    docker push $ECR_REGISTRY/<PROJECT>:<BUILD_VERSION>

- name: 'Logout of Amazon ECR'
  if: 'always()'
  run: docker logout ${{ steps.login-ecr.outputs.registry }}
For an example of the entire workflow, check out ci.yaml in kvrhdn/ ci-with-actions-and-ecr.
Concluding
If all went well, you should now have a constant stream of Docker images appearing in AWS ECR!
If you set up a test project, don't forget to delete the resources you created on AWS (delete the Docker repository in ECR and the user in IAM). It's easiest to delete everything using the console.